There can be times when you find that you need to get a screen recording tool. When you are going to make a video tutorial, record an online meeting for review, etc., a good screen recorder with useful features can be of great help.
As a well-known screencasting program, Movavi Screen Recorder is usually among the best recommendations of screen recorders. This post will review this tool and tell you why it’s worth a try. And also, introduce some alternatives for you if this tool cannot fulfill your need.
Reviżjoni tal-Movavi Screen Recorder
Movavi Screen Recorder is produced by the Movavi company, which offers a variety of multimedia programs. As one of the featured products, Movavi Screen Recorder is a lightweight tool that bears a simple design, but does well in recording and sharing videos.
Key features of Movavi Screen Recorder
Though this program looks simple, it contains most of the features you may need to record a video on the desktop, here’s an overview of the main and highlight features of Movavi Screen Recorder.
Support Different Types of Recordings
Movavi Screen Recorder enables you to select different types of recording modes. The most basic mode is to record videos. You can select to capture a video with the computer system sound, microphone, and webcam simultaneously. The recording area, the webcam position, etc. can all be adjusted (but the sound volume cannot be changed at the software, sometimes it may be confusing).
Besides this, there are recording modes that enable you to record audio or the webcam only to satisfy your specific need. For those who want to schedule a recording instead of capturing videos instantly, you can also set up at the Scheduler for automatic recording. Taking screenshots is always supported whether you are recording videos or not.
Useful Features and Effects
Apart from dividing different recording modes, the Movavi screen recording software also makes it easier to screencast. You can set up shortcuts and use the keyboards to finish a video capturing from the beginning to the end. As it allows you to record keystrokes, highlight mouse clicks and cursors, and also draw on the screen to make some annotations, it is very suitable for recording video instructions and tutorials.
It also supports up to 7 output formats so that you can select the one that is best compatible with your use. When you finish a recording, you can directly preview and clip the recorded video, and directly share it to social media or a video platform like YouTube.
Clear Interface and Simple Recording
This program just occupies a small corner on your desktop and shows minimal things, so you can quickly grab the information from each button at the mini menu. This tool is also good for those who don’t like complex operations because it just takes a few easy steps for you to start and end a recording.
How to capture screen with Movavi Screen Recorder
Now that you must know about the Movavi tool to some extent, here’s a quick tutorial on how to use it to capture a video.
Step 1. Launch the program on your desktop
You can get Movavi Screen Recorder from the official website. It’s compatible with both Windows and Mac. After installing, launch it on your computer, and you will see this. It’s the main interface of the program.
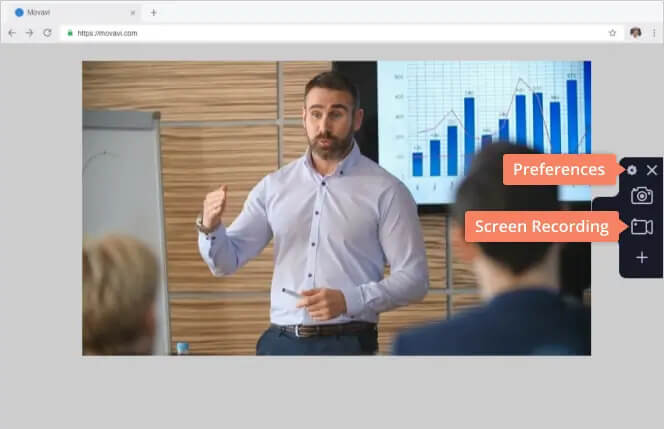
Step 2. Select to start video recording
Move your mouse to the Video icon and tap it, you will enter the video recording function. You mouse will automatically turn into a “+” for you to customize the recording area. You can also click the space button on the keyboard to record the full screen.
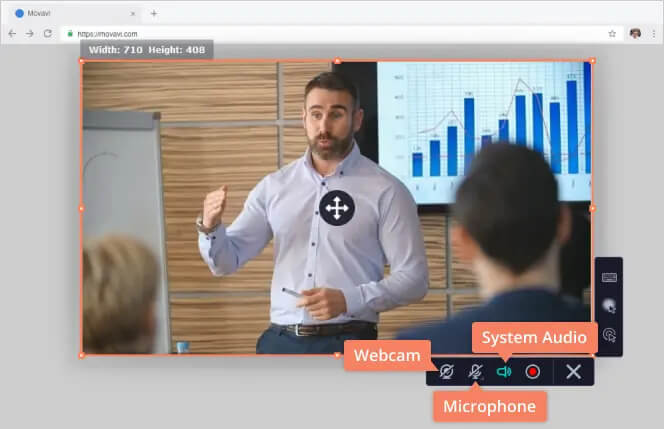
At the sidebar, you can freely choose whether to turn on the internal or external audio and the webcam or not. If they are on, you will see the icon in green. And at the right side, you can also select whether to show the mouse clicks or cursors during the recording.
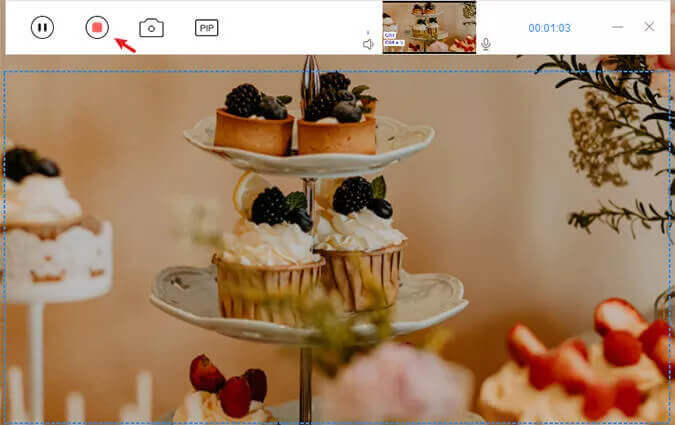
With all the settings done, you can now click on the red and white “REC” button to start recording.
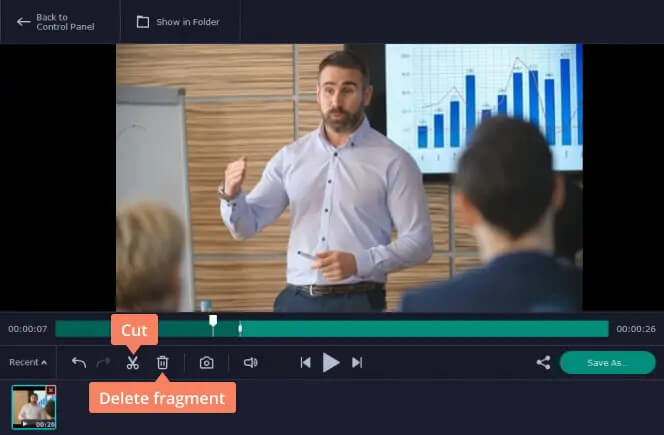
Step 3. Record video and add drawings
During the recording, you can still adjust the webcam or the sound. To emphasize the important points, you can also use the colored pencil to add some drawings. To capture a moment, you can click on the Camera icon to take a screenshot.
You can end the recording with the F10 shortcut (by default) or tap on the Square icon.
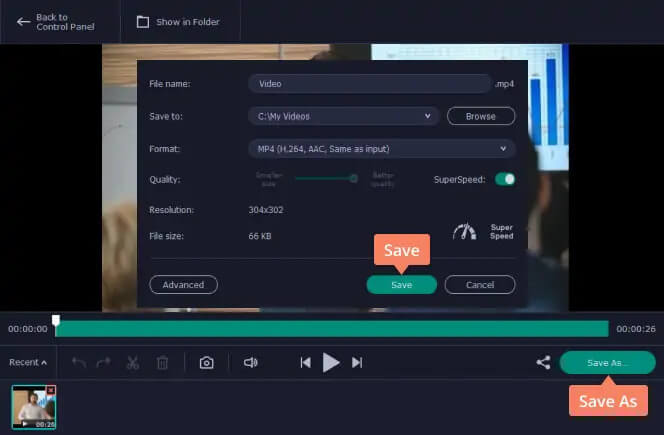
Step 4. Preview, edit, and share the recorded video
When the video is recorded, it will automatically turn you to the preview page where you can choose to cut the video, share it to different platforms, or export it locally.
When you click to Export, you will be able to select the output format and the destination.
Is Movavi Screen Recorder free?
Le Għalkemm Movavi Screen Recorder offers a trial version, if you want to use full features, you must upgrade to the paid version. The trial version also has some limits: there are watermarks on the output recordings, and the trial is limited to 7 days.
Here’s the pricing of Movavi Screen Recorder:
- Year license / 1 PC: $47.95
- Lifetime license / 1 PC: $62.95
Best Alternative for Movavi Screen Recorder – PassFab Screen Recorder
If you are seeking an alternative for Movavi Screen Recorder, the best recommendation is PassFab Screen Recorder.
PassFab Screen Recorder is also a screen capturing tool that can help you easily record different kinds of videos and audio on your desktop. It contains similar features with Movavi Screen Recorder and is more versatile in features.
Here are the main features of PassFab Screen Recorder:
- Record desktop activities with computer system sound, microphone, and the webcam simultaneously or separately.
- Lock the recording window so that you can record a single-window without distraction.
- Schedule a recording and remember the recording history and preset.
- Add annotations and drawings during the recording.
- Save recorded videos in MP4, GIF, MOV, AVI, and more formats at up to 60 fps.
- Capture videos with no watermark (or you can customize your own watermark).
How to Record Video with PassFab Screen Recorder
If you would like to see how to screencast with the PassFab recording software, this part is a tutorial for you.
Step 1. Download the software and launch it
PassFab Screen Recorder is compatible with both Windows and Mac. After installing, you can begin with the free trial version.
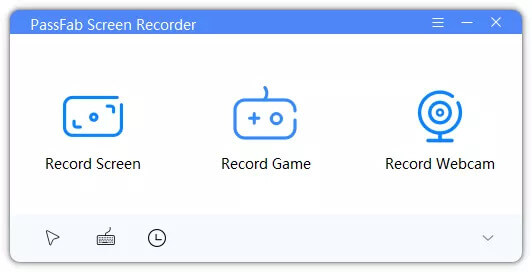
Step 2. Choose Video Recorder feature
Getting into the program, you will see the interface clearly showing all the recording modes you may need. For recording videos, enter the “Video Recorder” feature.
Step 3. Customize the recording settings
Now you are able to set up the recording as you like. You can first choose the recording area, turn on/off the internal/external audio and the webcam, adjust the sound volume, etc.
If you want to customize more settings, you can enter “Settings > Preferences” to do the adjustments to shortcuts, mouse effects, output formats, and more.
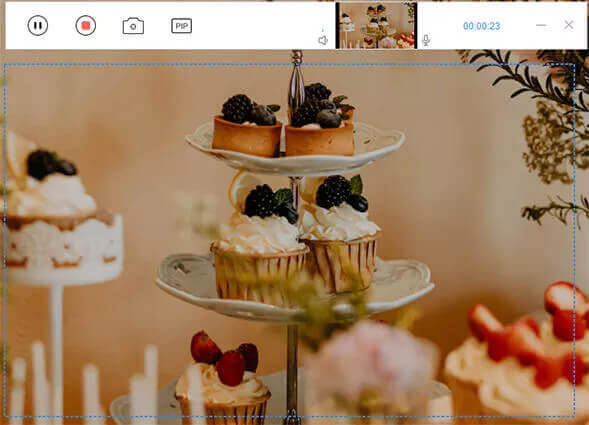
Step 4. Start Recording
Click the “Rec” button in orange to begin recording a video. If you want to use the advanced recording feature, you can also choose “Advanced Recorder” to explore more.
Step 5. Do some editing during the recording
When you are capturing a video, you are free to use the drawing panel to highlight some important points, add drawings or texts. Also, if this is a long-time recording, you can click the “Clock” icon to set a time period for the automatic ending.
Step 6. Save and check the video
When the recording finishes, you will be able to preview the video and cut the unwanted part before saving it. After the video is saved, you can easily share it to other platforms and review all the videos in the recording history.

Pricing of PassFab Screen Recorder
Similar to Movavi Screen Recorder, PassFab Screen Recorder offers a trial and paid version. The trial version is not restricted to the main features, but can only record video/audio within 3 minutes without a watermark.
As for the license plans, here’s the information:
- One-month license / 1 PC: $9.76
- One-year license / 1 PC: $34.76
- Lifetime licnese / 2 PCs: $79.77
PassFab Screen Recorder is the best Movavi Screen Recorder alternative program. It shares the same main features as the Movavi tool and offers more practical advanced recording features. Though it’s not that lightweight, it’s also well compatible with both high- or low-end computers, and the price is more affordable. Therefore, it’s also worth a try.
konklużjoni
Ġeneralment, Movavi Screen Recorder is a nice screen recording program. It covers most of the features that you need to record videos and audio and is especially suitable for those who prefer to get a lightweight and easy-to-use product. It’s best to use for recording video tutorials and calls.
But also, because it focuses on simplifying things, you cannot find some advanced recording features from this program, such as game recording or locking the recording window, therefore it may be a bit pricy from this aspect.
Kemm kien utli din il-kariga?
Ikklikkja fuq stilla biex tivvaluta!
medja tal-klassifikazzjoni / 5. Għadd tal-votazzjonijiet: